
Before You Remodel Your Kitchen, See This Kitchen Remodeling Project in Centennial, CO
- DAR - Design and Remodeling
- May 4
- 5 min read
Updated: 2 days ago
This kitchen remodel in Centennial, CO was about so much more than updating a kitchen — it was about reimagining how a family lives, cooks, and gathers. We opened up the space, brought in light, and turned a dated, cramped layout into a warm and functional heart of the home. Here's the full story of how we got there.
The Full Journey — Phase by Phase


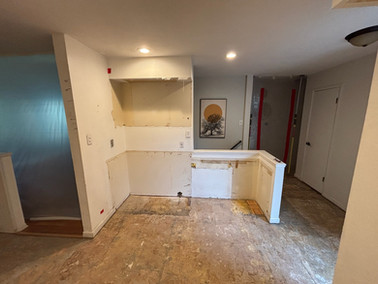
Let’s start from the very beginning. This is how the kitchen looked in its early phase.
Phase 1 — Preparation & Demo
Step 1 - Protecting the Rest of the Home
Before a single wall came down, we took great care to protect the rest of the home. Doorways were sealed, stairs were covered, and dust barriers were installed so the family’s living space stayed clean and comfortable throughout the entire project. A smooth project always starts with proper preparation.


Step 2 - Layout & Design — Opening It All Up
Working closely with the homeowners, we reimagined the entire layout to bring openness and new life into the space. Walls were reconsidered, the flow was completely redesigned, and suddenly that dream kitchen started to feel real.
More space. More light. More possibilities.
Before moving into construction, we created a detailed 3D design so the homeowners could fully see and experience their future kitchen. This step allowed us to fine tune every detail, from layout and cabinetry to lighting and finishes, and make confident decisions before the build even started.
Because when you can see your project before we build it, everything becomes clearer.

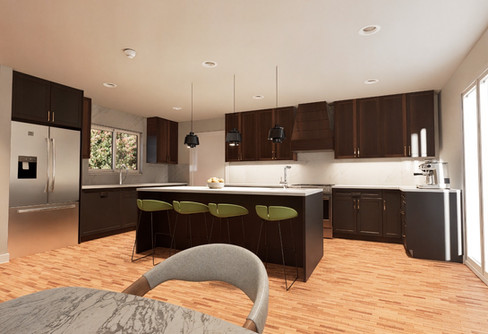


This is how our 3D design looks. We provide multiple ideas and refine the design as many times as needed — until you can confidently say, “This is exactly what I want.”
Phase 2 — Structure & Rough Work
Step 3 - Framing for the New Layout
With the design locked in, our crew got to work building the new bones of the kitchen. Framing is the part you'll never see once it's done — but it's everything. We framed precisely to support the new layout, ensuring every future element would line up perfectly.


Step 4 - Relocating the Door & Moving Walls
One of the most impactful changes was moving walls and repositioning the door to fully unlock the space. This is where the open, airy layout started to take real shape — and the homeowners got their first exciting glimpse of what was coming.

Step 5 - Rough-In Plumbing & Electrical
Behind every beautiful kitchen is a network of pipes and wires working hard. We roughed in all new plumbing and electrical, including adding a dedicated line for an extra sink — because this kitchen deserved every convenience. Everything was run cleanly and to code.
Step 6 - HVAC
A comfortable kitchen is a happy kitchen! We updated and extended the HVAC system to ensure perfect airflow and temperature control throughout the new layout. Whether it's summer cooking or a cozy winter dinner, the climate will always be just right.
Step 7 - Insulation in the Exterior Wall
Here's a hidden gem of this project — the exterior wall had no insulation at all! We corrected that right away, adding proper insulation that will keep energy bills lower and the kitchen warmer in those Colorado winters. A small step that makes a huge difference year-round.

Phase 3 — Walls, Floors & Surfaces
Step 8 - Drywall
The walls finally came together. Fresh drywall was installed, taped, and mudded throughout the space, bringing everything one step closer to the final look. Seeing the room close in and take shape is always a rewarding moment.
Step 9 - Installation of New Door
A new door was installed to complement the updated layout. It was fitted perfectly, aligned with care, and chosen to match the overall style we were building toward. First impressions matter — and this door sets the tone for everything that follows.
Step 10 - Texture & Painting
This step transformed the space! With walls textured to a beautiful finish and painted in the homeowners' chosen palette, the kitchen truly came alive. Color has an incredible power to define a room — and this one was looking absolutely gorgeous.
Step 11 - Hardwood Flooring
There's nothing quite like the warmth of beautiful hardwood underfoot. Our team installed stunning hardwood floors that instantly elevated the entire space. Rich, durable, and timelessly elegant — these floors will be loved for decades to come.

Phase 4 — The Beautiful Finishing Details
Step 12 - Cabinetry Installation
The cabinetry went in and the kitchen truly transformed. Each cabinet was leveled, aligned, and secured with precision — because great cabinetry is all in the details. The new layout made the most of every inch, with smart storage solutions built right in.
Step 13 - Countertops
The countertops arrived and the kitchen found its centerpiece. Beautiful, practical, and built to last — these surfaces will be the heart of countless meals, conversations, and memories. Watching them be set into place is always a genuinely exciting moment on any project.
Step 14 - Backsplash Tiles
The backsplash is where personality shines! Tile by tile, our team brought this feature wall to life — adding texture, pattern, and a real sense of craftsmanship. This is the detail that guests always notice and compliment first.

Step 15 - Final Electrical
With surfaces in place, our electricians returned to complete all final connections — outlets, switches, under-cabinet lighting, and fixtures. Everything was tested thoroughly so the homeowners would have a kitchen that works flawlessly from day one.
Step 16 - Final Plumbing — Fixtures
The plumbing finale! Sinks, faucets, and the new additional sink were all connected and tested. We made sure every fixture was sealed, flowing perfectly, and looked exactly as it should. Running water in a brand-new kitchen — there's no better sound!
Step 17 - Trims & Baseboards
The trims and baseboards are the frame around a masterpiece — and we gave them the same attention as every other element. Precision cuts, tight joints, and a flawless painted finish. These final details are what separate a good job from a truly exceptional one.


The Final Review ✓
Every corner inspected. Every detail confirmed. This kitchen remodel in Centennial, CO passed our thorough final walkthrough with flying colors — and the homeowners' smiles said everything.
Welcome to your dream kitchen!


Here’s a look at the full before and after process. We love how this transformation turned out — what do you think?
This is the full process behind our recent kitchen remodeling project. If you have any questions or are planning your own project, feel free to contact us or schedule your free in-home estimate.